
Bogen-Lenco Idler-Wheel Turntable Restoration
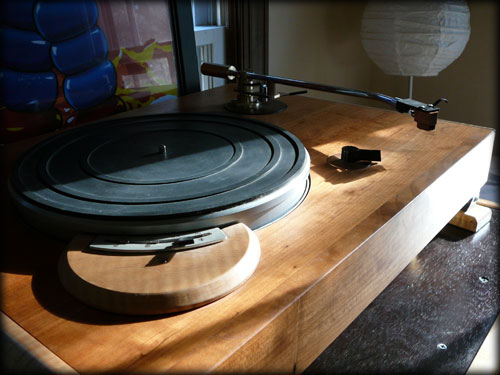
It's a Lenco heavy-platter idler drive turntable from the 1960s,
planted in a new cherry base with a Schick 12 inch tonearm.
Yes, it's 2007, time for another turntable project. The basics - take an old Bogen idler-wheel turntable and make it huge, heavy, and capable of mounting multiple tonearms...
There are many beautiful Lenco projects out there on the web, this is really just a copy of some of the ideas floating around.
Disclaimer:
Look out folks, you can ruin your turntable with some of these tweaks if you screw up.
Follow all the suggestions of folks who are wiser than me and don't even
try this if you don't know what you are attempting.
Take responsibility for your own actions and don't sue me, OK?
In this page:
- Main Features
- Online Lenco Turntable Information
- Detailed Checklist
- Pictures from the Final Assembly
- What I Learned this time around...
Main Features:
- Laminated cherry base with hand-rubbed oil finish weighs approximately 40 pounds - 25 3/4 wide x 18 3/4 deep x 3 inches thick with figured maple side trim to cover the end grain
- Wood base was routed and carved to follow mechanisms under the base plate and for motor clearance
- Flat steel top was removed with an angle grinder, with only the area under the platter with a 1/4 inch lip and the mount for the speed adjustment position remaining
- Reworked parking linkage and power switch position inside cherry base - clear acrylic cover beneath
- Lenco motor is cleaned and re-aligned, power cord is re-wired with 16 ga stranded copper wire and solid 14 ga ground wire
- Cocobolo removeable armboards fit into two ports on the base, inner position is for 9 inch tonearms, outer armboard is for 12 inch arms. Both armboards are circular to provide overhang adjustment with eccentric tonearm mounting positions.
Tonearms tried so far:
- Michell Focus silicone-damped unipivot arm (hard to find high-compliance cartridges from my collection to match with this one - beautiful engineering and machining)
- Syntec 220 heavy professional radio station arm (big primitive heavy construction, kinda blah sound)
- Ortofon SMG-212 tonearm with a brass counterweight from an Empire arm (OEM lead/brass counterweight was mangled by a previous owner, but it makes music)
- Gray 'tweener' 10.5 inch transcription arm, laminated wood with aluminum headshell and pivot assembly. Lateral pivot is silicone-damped (very dynamic with a Denon DL103, was the favorite until the Schick came along)
- (the Winner!) Thomas Schick 12 inch transcription tonearm, aluminum tube with removeable headshell
Other tonearms in the wings for future projects:
- Rega/Moth RB250 from my Empire TT project
- DIY cherry long unipivot project
- Fairchild model 280 spring-loaded dynamic tonearm - sort of a 1950s ancestor to the Dynavector DV505
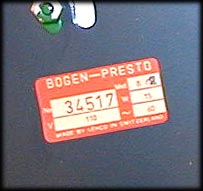
The Bogen-Presto B62 table (Serial Number 34517) I bought on eBay is [was] identical to a Lenco L70, a 'heavy platter' model that was introduced in 1962. It had identical aluminum trim and the standard arm for the L70 as well. One interesting thing about the unit I acquired is that there were no balancing holes drilled on the outside of the platter as are frequently seen in photos - this allowed me to raise the platter up above the surface of the base without viewing holes spinning around every revolution. Raising the platter helped match VTA with the various tonearms I had on hand; the original design with the recessed platter required a very low cartridge height above the deck compared with modern arm design.
Links to Lenco Turntable Information
- LENCO HEAVEN forum - Great tutorials with pictures and advice - use the search
- Strictly Idler - drive that is! - Why do they sound so good?
- LencoLand - Lost Worlds of Lenco . . .
2004-era site with good basic information - Stephano Pasini's Audio Page Lots of information on vintage turntables
- Another Lenco Rebuild
- The Vinyl Engine
Incredible database of manuals, tonearm data, cartridges, etc. - Audiogon Thread on Lencos
Where the prices started to rise
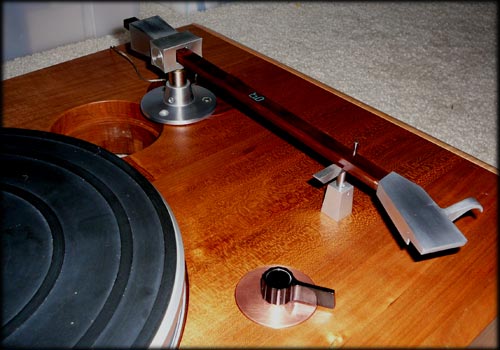
Gray 'tweener' 10.5 (pivot to cartridge) inch transcription arm with Denon 103 -
Gray arm is made from laminated wood and has silicone-damped lateral bearings, *very* dynamic.
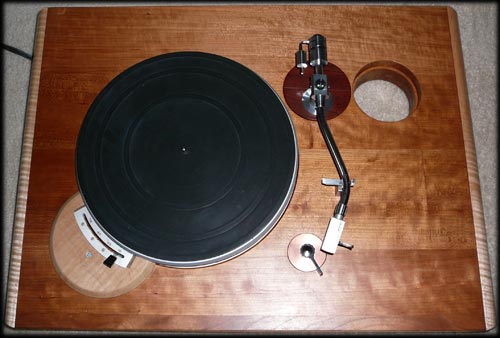
Another tonearm, a Syntec 220 professional arm formerly used in a radio station -
it's in good shape but doesn't sound as nice as the Ortofon arm...
Detailed Checklist - Done:
- Test main bearing, diassemble, clean, re-lube
- Re-lube plastic idler wheel and test
- Purchase replacement metal (5 hole) idler wheel and arm on eBay
- Re-lube metal idler wheel and test
- Wrap idler arm with heavy teflon plumbers tape
- Complete tear-down, remove tonearm, cueing, mechanisms, motor and power switch
- Cut down steel top plate - remove everything except circle under the motor
- Paint steel base with silver hammerite paint
- Polish slots in steel base for speed change mechanicals
- Reassemble mechanisms to steel base with new grease
- Laminated cherry hardwood base, routed for motor and speed change mechanism
- Routed places for replaceable cocobolo tonearm boards
- Fit cut-down steel base, machine cut-through for idler arm lock and power switch
- Season base - aged 6 months - then cut/sand to re-square top and bottom
- Finish base with Minwax natural oil finish and paste wax
- Cut and finish side cheeks from figured maple, attach with flush stainless wood screws
- Cut and finish figured maple raised support for speed change lever
- Tear-down motor, remove rotor and disassemble main and nose bearings, re-lube, re-center coils around rotor, test for noise/adjust/test/adjust/test
- Replace electical cord with braided 16 ga copper with 14 ga solid ground
- Re-assemble with new base
- Install original power switch through copper cover into cherry base so that flange can be screwed into bottom of switch shaft and idler lock fork is actuated
- Add small screws inside cavity to limit rotation of switch shaft
- Cut clear acrylic cover for electrical switch, mount power switch (rewired and inverted) on standoffs so that the fork on the switch fits over the pin on the mechanical switch shaft
- Route power switch wires to motor, attach power cord leads and switch leads at motor with new switch noise capacitor (Sprague orange drop)
- Swap out ball bearing with bicycle shop, polish main shaft with metal polish, and re-lube main bearing with gunsmith moly-lube
- Purchase Mapleshade threaded megafoot footers for base http://www.mapleshaderecords.com/audioproducts/megamount.php
- Add threaded sockets for megafooters in base, and screw feet into base (+18 pounds!)
- Apply heatshrink tubing to motor mounting threaded posts
- Apply mica-loaded vinyl noise sheet to spots on top of steel base under platter
- Apply mica-loaded vinyl noise sheet to well in center of platter to level it off
- Clean the OEM mat with rubbing alcohol, then soap and water, then alcohol, then rubber renew
- Glue OEM rubber mat onto platter with 3M spray 77 adhesive
- Adjust speed locator clips using VPI strobe mat
- Replace idler arm spring with elastic cord from cloth store
- Try loosening mounting bolts for steel plate - listen - repeat
- Ground the motor and steel plate
Still Waiting...
In early April 2011 I ordered (and paid for) a replacement main platter bearing from Jeremy Clark in the UK... as of January 2012, despite emailed promises of delivery in August 2011... and November 2011... still no bearing.
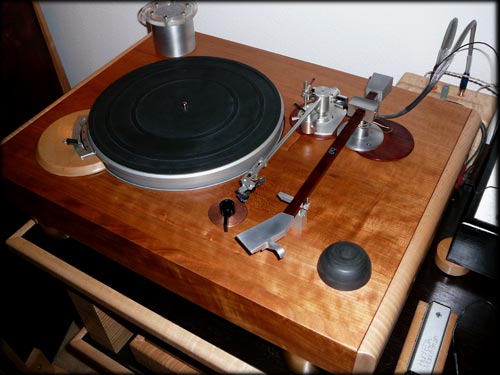
Just another Lenco, move along, move along -
that's a Michell Focus unipivot on the inside position, and the Gray on the outside again.
By resting the inside arm headshell on the deck, the Gray arm can swing over -
but I still have to swap arm cable connections for comparisons. (Not a long-term solution, but it was useful for A/B comparison)
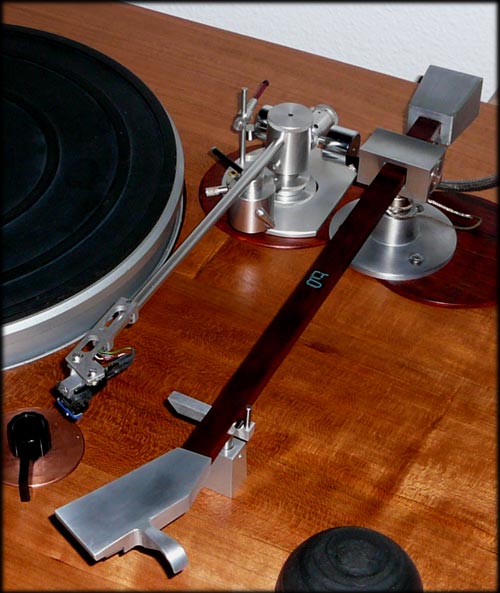
Closeup comparing the Michell and Gray tonearms - sorry about the stray AQ sorbothane dome resting on the corner, it's not part of the setup
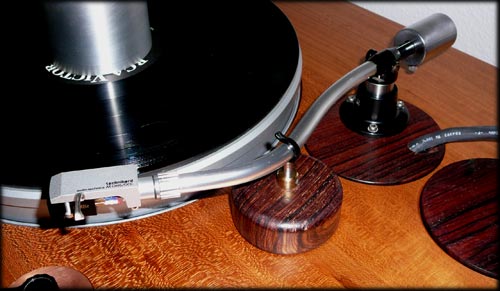
A better view of that Ortofon arm with the oddball replacement counterweight, Audio-Technica headshell and Denon DL103R cartridge...
A Few Pictures from the Final Assembly Process
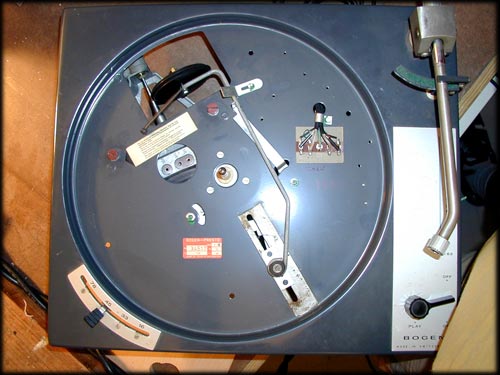
Donor Bogen-Presto B62 with platter removed...
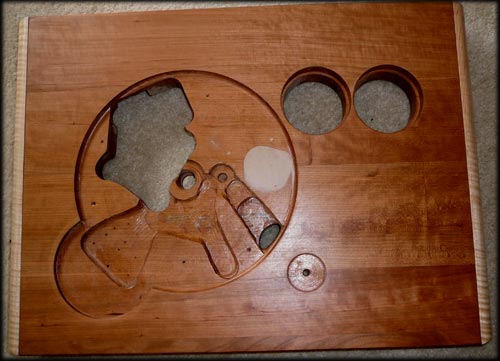
Slab of laminated cherry with cutout for Lenco mechanism before final assembly...
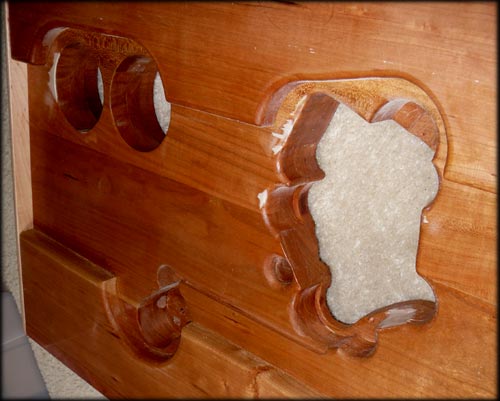
The bottom, waiting for a purpose...
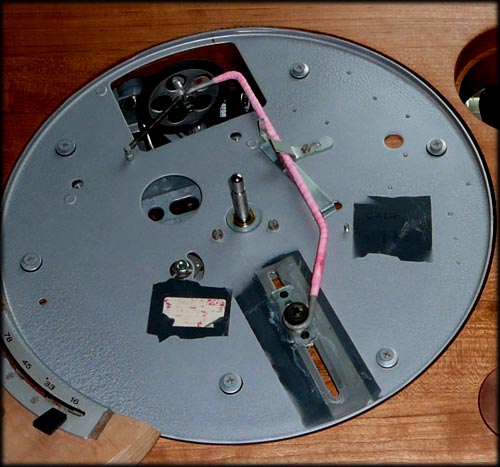
Closeup of cut-down Lenco mechanicals in place. Plate is held to base with 6 screws through neoprene/steel sealing washers.
Idler arm is wrapped in pink heavy teflon plumbers tape.
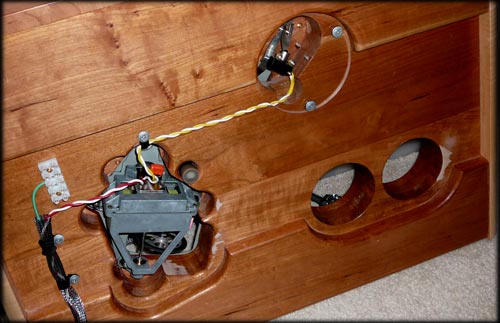
Reworked wiring on the bottom of the new base - electric power switch is under clear acrylic cover at upper right.
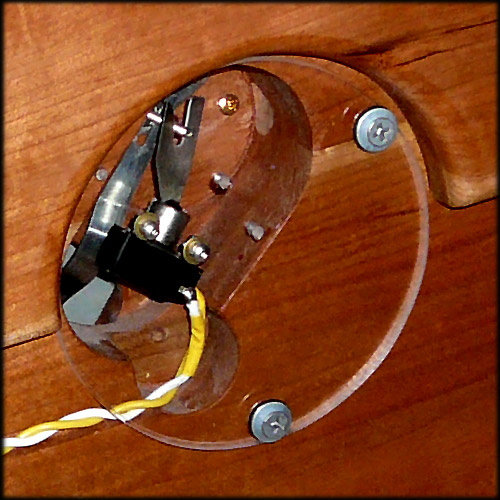
Close-up of switch area - Pin mounted in flange switches power and moves idler arm control bar together.
Fiddly to get everything lined up, but worth it.
Rebuilt power switch (removed the old leads and attached new 16 ga wiring)
is attached to the inside of the clear cover,
blurry brass screw-head above the fork in the switch is a limit screw that keeps
the cam plate on the bottom of the top mounted switch from swinging too far.
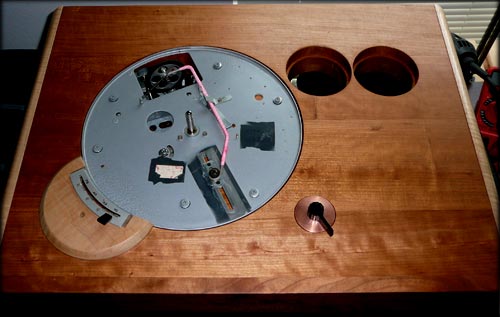
It's big - lots of room for future tonearm experiments.
Plus, it's heavy; total volume of wood is around 10 board-feet, less mounting holes.
Disclaimer:
Look out folks, you can ruin your turntable with some of these tweaks if you screw up.
Follow all the suggestions of folks who are wiser than me and don't even
try this if you don't know what you are attempting.
Take responsibility for your own actions and don't sue me, OK?
What I Learned this time around...
- Solid wood moves a lot. So if you don't have access to well-seasoned wood (I don't), and you don't have a pile of wood seasoning for the next project (I didn't), you may find that the shape of a large laminated block of wood curls and warps over time.
- This tendency can be overcome by laminating the wood and then aging it (waiting 6 months or more), then trimming it square
- Glue up your sections so that they all run the same grain direction - cross-laminated blocks will split over time. The best you can hope for is that all of the sections of wood grow and shrink together.
- Use flat sections of board - this may be difficult depending on your source for wood
- Buy a *lot* more wood than you need - there will be waste
- Use good glue - an article in AudioExpress a few years ago by a speaker builder declared that epoxy was the best-sounding speaker project glue... but you have to balance the sound *of the glue* with other factors - is it a good joint? Do you have enough clamps to get good pressure on the joint? Will the glue make a difference on the finish of the piece?
- Use a frame to get a flat surface - when you are laminating a flat surface you need something heavy and straight to clamp against, at least for the first few layers
- Use a *lot* of clamps to get a consistent joint
- Make the piece oversized and cut it down to final size after the gluing - this ensures square sides if you have a tablesaw up to the task
- Cut the clearance holes after the base is true - I prefer Forstner bits on a drill press and a spindle sander to clean up through-holes and deep pockets, and a router with templates for larger areas


