


An Innocent $99 Preamp Kit... called 'Foreplay'
Part 2; in which the protagonist learns to his dismay that tubes are cool and he really can build his own preamp...
I must have one of the most understanding 'spouses' around for this sort of thing. My partner Blithe is incredibly tolerant of speakers in the middle of the floor and tweaky looking cables running everywhere. After I found the Foreplay kit online, she bought it for me as a Birthday present back in September, though with the house renovation and upgrade parts ordering it was 2 months before I was able to sit down to start assembling it.
This was my first foray into the world of DIY electronics; while I was with SpectraLogic we built a lot of cool microelectronic systems and even debugged some RF problems some of our consulting clients were experiencing, but I was totally dependent on the engineering staff to keep me out of trouble. I had a great time learning the practical theory and techniques to build this preamp, and would highly recommend it as a starter project to anyone who is interested in trying something like this. Doc and the folks at bottlehead.com are really helpful and supportive of 'tube newbies' and have put together a great kit here with clear instructions and lotsa room for growth.
Despite the fact that this was a first project, ambition got the better of me and I ended up changing quite a bit in my design from the original stock Foreplay shown at right. But this also gave me a chance to learn many new things, and everything came out just fine. That's probably more to do with the excellent design Dan Schmalle (AKA 'Doc Bottlehead') has provided than with my own blind gropings with the technology. The Foreplay has a really simple and direct circuit, so it's possible to experiment easily with it and not get in too deep.
I'm sure that Doc would want me to point out that his advice on making gradual changes is really sound; don't do as I did (repeatedly) and make too many alterations at once, else it gets to be very difficult to hunt down problems that do crop up. It's always easier to evaluate a single change than a whole chain of things.
Disclaimer:
Tubes mean big voltages. Big voltages can stop your heart and kill you.
Be careful! Follow all the suggestions of folks who are wiser than me and don't
even try this if you don't know what you are attempting.
Be responsible and don't sue me, OK?
In this page:
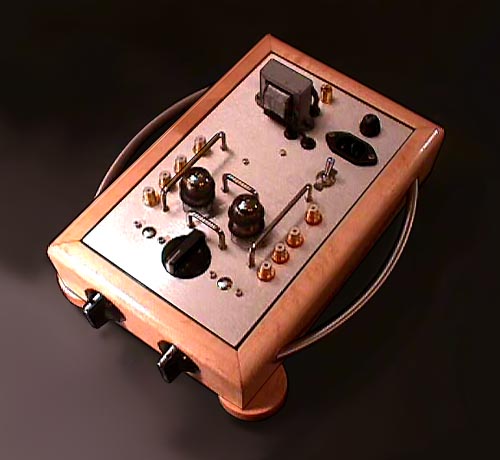
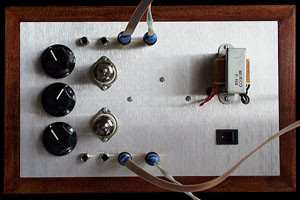
Top view: Electronic Tonalities 'Foreplay' preamp, pRC signature model.
Bottom view:
Yup, nothing between you
and all those pretty parts.
Be careful!
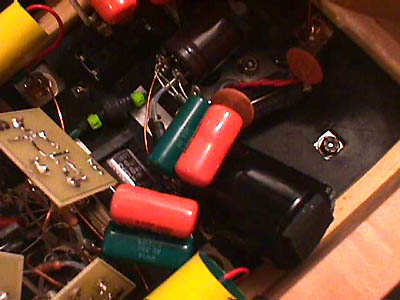
Detail: Bypass caps in the high voltage power supply section.
(Snubber on Rectifier input, Dale wirewound resistors, Teflon wire insulation, Star Ground at negative of 3rd capacitor,
Ferrite beads on filament supply, Sorbothane layer backing top plate)
So. What's the big deal?
1) It sounds great
2) I built it myself!
Seriously, there is great satisfaction in actually feeling like you have mastered some small piece of the technology that surrounds us. While I cannot/will not say that I've mastered the art of preamps, I do have a fantastic sounding addition to the 'audiophile' system in our house, and (I think) a much better grasp of what it takes to make a good-sounding design.
One of the benefits of tube designs is that they are simple. If great truths are simple, then the Triode has got to be one of the coolest and greatest truths ever made by humans. The simplicity of the triode makes it much easier for a beginner to build a successful circuit, and to take faltering steps towards making it better.
I won't try to explain the basic design as I'm sure others, Like Doc, can do a better job, but if you are interested, you can read more about the changes I made below.
Hrm. What did I change?
Vibration Control
With a background in industrial design, this was one part of the modifications
that I felt really comfortable altering from the very beginning of the project...
- Sorbothane Sheet under chassis plate (self-stick 1/8 in thick, from Welbourne. Parts Connection and Parts Express have less$ alternatives)
- Isolated Transformer (Rat Shack vinyl grommets through chassis holes and a sorbothane patch under the XFMR frame)
- Sorbothane on Tube Sockets (doesn't adhere well to ceramic sockets, will try silicone caulk next time)
- Welbourne Tube Dampers (Nitrile o-rings, like the RAM labs rings. Won't melt onto tubes)
- Homemade rollerblocks (too lively, had to remove these)
- Vibrapods (much better, used three size 1 'pods for weight of Foreplay)
Front Volume Controls
Eventually a turntable will be used on top of my stand, so I needed a way to adjust
volume from the front of case. This was a pretty easy feature to add and also improved the rigidity
of the chassis plate. The volume pots are the same distance from the tube sockets, so the
wiring lengths and routing are the same as the top mounting. Also makes it easier to operate,
since the original design has the knobs really close to each other to reduce signal paths to a minimum.
Be careful when tightening the bolts if you use a dampening layer, you'll see the chassis plate
start to warp when they are too tight...
- Aluminum Angle support
 (from the local hardware store)
- Shaft Extension Collars (Welbourne. Collars with 2 setscrews to attach another shaft)
- Aluminum Extensions (1/4 inch aluminum rod from Home Depot cut to length)
- Chrome caps on chassis holes (again, from a local hardware store, backs filled with sorbothane after insertion)
Upgraded Parts
I added a range of 'boutique' parts to improve the sound of the kit.
This is an easy, yet sorta lame way to improve the sound by basically throwing money at it.
The metal film resistors that Doc supplies with the kit are pretty good actually,
but the coupling caps and connectors can be improved a lot. This circuit is so simple that it really
isn't very much money to go whole hog on the resistors too.
- Ceramic Tube Sockets with gold plated pin connectors (easy to solder)
- Vampire RCA jacks (isolated ground from chassis, back insertion models)
- C4S Anticipation Upgrade (magic impedance effects on the tubes!)
- Upgraded Resistors
- Caddock (Welbourne. Very low noise 3/4 Watt resistors. Ack! $3.50 a pop, but there are only about 8 to replace in this circuit)
- Holco (Welbourne and Mouser, used for load resistors in C4S)
- Dale (Mouser, good alternative to Holco)
- Dale Wirewounds in Power Supply (Mouser. Many tubeheads think that WW resistors add a touch of RF high-frequency filtration to circuits)
- Mills Wirewounds in snubber (Welbourne. 12 Watt 10 ohm resistors used on the incoming 125 VAC line from the transformer)
- Upgraded Capacitors
- Panasonic 390uF in B+ PS (Digi-Key. Hard to physically add more than one of these high-voltage electrolytic caps into the tiny chassis. Used for the second of three PS cap stages)
- Bypass Caps in HV PS per Walt Jung (re-purposed the old Foreplay film/polyester caps here, with some Vishay 'Orange Drops' to bypass the PS caps and 'speed 'em up'. Still evaluating change and may remove them, could be causing more noise?)
- Hovland 3 uF Coupling Caps (really nice but pricey coupling caps for the output. This is really the only capacitor in the signal path, so it better be good. These are a larger value than the 2.0 uF polyester caps supplied, but seem to work well and even increase the bass a little compared to a set of 2.2 uF Solens tried. They are BIG, and with stranded leads tend to 'floop' around when you are working on revisions. Added some Velcro to the caps and case sides to hold 'em in place when in use. Welbourne, also Antique Electronic Supply and Percy)
- Grayhill Selector Switch (sealed gold contacts, 6 position switch that can be locked at any number, 1 to 6 in range. Welbourne, also Digi-Key)
- Welbourne Teflon tubing for internal wiring (easy to use 18 gauge clearance sold by the foot. Just the thing for insulating wires that may accidentally touch in that tight tube socket area)
- Braided Power Cord (12 gauge solid conductor, based on the Valve 4 - 1999 article 'New Tricks for Foreplay')
- Terminal Strips (RadioShack.com 10-pack. These have larger holes than the ET-supplied strips, which comes in handy for those multiple ground connections)
- Filtering
- IEC jack with RF filtering (RadioShack.com small PREO LC network inside connector can)
- Jon Risch CLC at entry (DIY line filtering on back of IEC connection above, larger values for more protection)
- Ferrite Beads (Welbourne, high-permissivity, not sure if these really do anything but I had 'em around)
Re-routed Ground Bus
Doc admits that the ground scheme for the Foreplay is designed for easy construction
and can be improved; there have been several discussions on this on the Bottlehead Forum.
I went to a hybrid Star Ground method, isolating all of the grounds from
the chassis except at a single filtered contact point. Input and output and volume pots all
get separate ground wires; C4S and high voltage grounds are run to separate tabs.
All 'front' grounds are then tied together and a twisted pair of 20 ga copper is run
to the PS ground bus to connect at the negative of the third PS capacitor.
The ground bus is tied to chassis at this point with a paralleled RC network.
Also added a nice ground post to the chassis for tying in a future turntable.
- Star/Hierarchical Ground structure
- Vampire Isolated RCA Jacks (rear insertion, nuts on outside of chassis. Easier to make changes later with this design, but the ground wires are soldered into a slot milled into the side of the body. Need a big iron to heat up this much mass and attach ground wires)
- Isolated Terminal strips (1/4 inch threaded standoffs)
- Buddha-style Filter for Signal Ground to Chassis (.1 uF Orange Drop in parallel with a 10 ohm WW resistor)
- Vampire Chassis Ground post (nice design, accepts spades plus one banana plug)
Appearance
Again, this is something I was ready to tackle from the beginning. With the top-plate
layout of the Foreplay, it already has an industrial aesthetic, I just took it further
with the wire handles and finishes. I like it.
- Wire Handle Tube Guards (RadioShack.com and Mouser)
- Large Side Handles (Home Depot Expo. These are surprisingly useful when I'm repeatedly pulling it out of the system and carrying it to the bench for mods. Be sure to insulate inside bolts for your protection)
- Stainless steel 6-32 Allen bolts and Nylock nuts (Home Depot or local hardware store. Plain steel can corrode in contact with aluminum because of electron exchange between the dissimilar metals)
- Power Switch (chrome bat-style SPST. Goes with the chrome tube guards and has 15 Amp rating)
- Silver Hammertone on Transformer (really hides the uneven paint on the supplied XFMR)
- Clear Chassis Plate (supplied plate is laser-cut brushed aluminum. Pretty nice too)
- Birdeye Maple case (7/8 inch thick with a recessed ledge for the chassis plate. Extra weight helps keep it in place on the shelf. Small case needs less wood and this was an easy project with a tablesaw and router. Added three round wood footers, cut out with a holesaw on a drill press, attached with threaded brass inserts and silicone caulk for vibration control. The finish is Birchwood-Casey TruOil gunstock finish, which is really easy to apply and makes a durable, easy-to-repair gloss coating that shows off the grain of the wood)
- Paduak volume knobs (when I get around to finishing them these will be 2 inches diameter and 1 1/2 inches deep with a brass pointer)
- Top-mount Fuse holder (while I have not needed to change a fuse yet, it is more convenient, but probably not as good at conducting current as the supplied under-chassis fuse clamp)
Stuff from Valve Magazine
I am amazed by the creativity and helpfulness of this publication,
available in PDF form on the Valve page of the Bottlehead site.
They have CDs for back issues for sale, as they only host the most recent edition online. Get 'em!
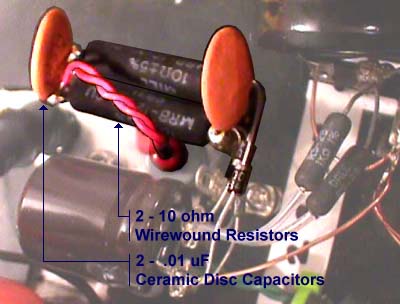
- PS Snubber (WW resistors and ceramic caps to suppress the back noise from the UF4007 high-voltage voltage rectifier circuit, preventing it from conducting back into the filament and wall sections of the transformer)
- Volume Shunts (Lynn Olsen is a genius! Removes the noisy volume pot from the circuit, instead running it through a 47.5 kohm resistor for each channel. Use a premium metal film resistor here and it makes an instant improvement)
So, what was left over from the Kit?
- Chassis (Top) Plate
- Power Transformer
- Two 220 µF Electrolytics for PS
- C4S Anticipation boards and transistors ($75 extra, and well worth it)
- Sweet Whispers mono Attenuators ($45 for a series attenuator kit? Whatta deal from ET!)
- A great design to work from
- A lotta help and encouragement from Doc and the Bottlehead forum (Use the search function at Audio Asylum and find all sorts of great ideas)
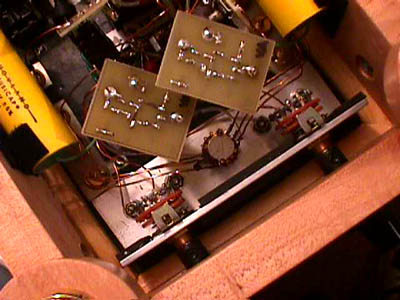
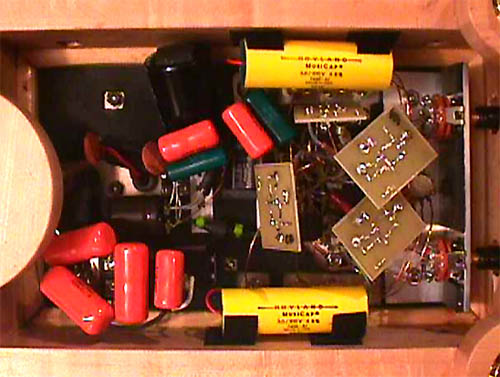
Attenuators and Constant Current Sources:
Bracket for front volume adjustment, 3-D point-to-point wiring, Grayhill selector switch, Caddock resistors, and Hovland 3.0 uF coupling caps
What did I learn?
A lot about neatness and patience
It really pays to take your time and be obsessive about each change
- check each solder joint
- make sure that wires are routed clear of other components as much as possible
- avoid running signal and ground in parallel with high-voltage or filament lines
- be careful with the potentially lethal voltages in these units.
The fun of 'Tube Rolling'
All electronic components degrade with use, and some just degrade over time; but yet another of the beauties of tubes is that you can change out the active components easily when this happens. Even more fun is the chance to hear the difference between different tubes and manufacturers if you purchase extra sets of tubes. This shuffling of tubes is called Tube Rolling. The Foreplay uses one of the most widely available (and inexpensive) tubes, the 12AU7, a medium mu dual triode (that's 2 small triodes in a shared glass envelope with shared filament connections). There are several other ubes which are direct substitutions, including the ECC82 (euro designation for the 12AU7), the 5814 and 6189 (US Military designations), and 'Premium' versions of 12AU7 such as the 7730, the 7316, and the ECC802. A couple of companies are manufacturing new 12AU7 tubes, but the richest stock comes from NOS, or 'New Old Stock' supplies. NOS tubes are tubes that were stored back when they were manufactured in the heyday of tubes, the 50's and 60's, but never used. Most any tubehead will tell ya they don't make like they used to, so the NOS tubes are generally preferred. More info here, on the SND 12AU7 page. A set of two tubes is required to run a Foreplay, and these can vary in price from $8 a pair to more than $60 a pair for specially selected low noise specimens.
So far I've tried seven sets of tubes in this design:
- The supplied unmarked set from ET (Probably Chinese, unexceptional)
- Philips JAN 6189A (JAN stands for 'Joint Army Navy', or US military surplus NOS. One hummed)
- Philips JAN 5814A (Better than the Chinese, but not as good as what follows)
- National 'Gold' 5814A (Smooth, balanced, but a touch, well, hazy)
- Tung-Sol 12AU7A (Good midrange and treble, still evaluating these)
- Siemens 5814A (Nice)
- Amperex 12AU7A/ECC82 (Orange print, not 'Bugle Boy'. The best so far)
The Game of Tube Matching
Tubes have a fair amount of variability, and with a parallel/sortof mono design, the Foreplay works best with matched tubes. Bill Perkins on the joelist estimated that within the same batch of tubes from the same manufacturer, values vary as much as 20%, so it really is impossible to select two tubes at random and hope that they will match. The Bottlehead C4S helps a lot with this by compensating for some variance, but if the sections are off by 20% what does that do to the sound?
Many tube vendors offer to measure and match tubes when you buy them for a small extra fee, but you can also do this yourself using the Foreplay and a multimeter as a tube tester. In fact, this is probably one of the best ways to match tubes, since they are seeing the ture load of your system. To do this, get three jumper wires with spring hook clips, and carefully attach one each to the signal ground bus, socket terminal A8, and socket terminal B8. You did unplug the unit first and take proper safety precautions, didn't you? Now attach the common lead of your multimeter to the ground jumper wire and the other lead to the wire from either A1 or B1. Keep all of the jumper wires well away from each other, and any conductive surface while you do this test. And be mindful, we are talking about VOLTAGE here, so be careful attaching and moving the meter probes!
Now insert the tubes to be tested and power up the preamp. Select Volts DC on the multimeter and turn it on. You should see a constant voltage of around 40 to 45 Volts after the amp has warmed up 30 seconds or so. This is the value you are interested in comparing. Write it down and move the meter probe to the other socket jumper and compare the values. Write down the other value. Power down the preamp and swap out the tubes, then repeat...
Ta Daa! you've just measured the output signal voltage.
Since these tubes are run very conservatively, some folks argue that measuring the transconductance (the other value used for matching tubes), is not as critical, especially since these values are closely interrelated when you are measuring in an actual circuit. Closer matching is almost always better, but then I don't have more sophisticated equipment. Most of the 'matched' tubes I've purchased and tested are off by a volt or two, but if you have enough tubes to test you can get pretty close. Of course, there is more to good sounding tubes tan just having matched gain, so you'll need to use your ears and decide (good, a subjective decision here) whether the set is a good one.
But hey, that's the fun part.
More later.
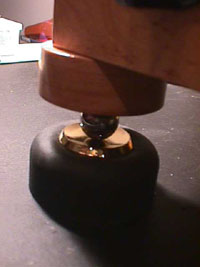
Can't win 'em all; too sensitive to even flip switches with these DIY "Rollerfeet"".
Tips for those that follow...
Tools you really (really) need:
- Digital Multimeter (with Resistance, VAC, VDC, Amps and milliAmps current measurement. 600VAC isolation or better)
- Sharp point needlenose pliers (good ones, you'll use these a LOT. Miracle Point or Xcelite)
- Flush cut nippers (handy when things get tight later in the assembly. Home Depot has a set with both the Xcelite 170M nippers and 378M fine point pliers for about $12, the ones with the pale blue handles)
- Large (35 - 40 watt) and small (<25 watt) soldering irons
- Cleaning sponge for Soldering iron tips
- Insulated tweezers (could also apply heatshrink to an existing pair)
- Wire insulation (Teflon or heatshrink or both, also great for DIY cables)
- Solder sucker (make sure it is easy to clean)
- Jumper wires with hook clips (at least 4, color coded)
- Third Hand (weighted base with articulated arms and alligator clips)
- Magnifying glass on stand (or magnifying lamp, or magnifying glasses)
- Safety glasses for de-soldering, etc. (Use 'em or lose 'em)
- Good quality wire strippers (I like Ideal or Klein)
- An understanding spouse, children, employer, whatever...
- A well-lit workspace where things can stay put for a few days
- A few small ziploc baggies (you know, for parts)
- A Sharpie indelible pen (to identify tube socket pins, etc.)
- A trash can next to you (helps keep that work area clean)
Avoiding Mistakes:
- Practice soldering (get an inexpensive Velleman kit or something)
- Have enough wire on hand (Dang! I cut that one too short... again.)
- Order extra parts (hey, it's as easy to order 4 instead of 2 of most things)
- Solder insulated RCA jacks (ahem) BEFORE you attach them to avoid melting the insulators
- Be neat with wire attachments (and avoid kinking the wires)
- Watch those socket tabs for shorts
- Check every solder joint with a multimeter after it cools
- Check wire spacing before connecting power
- Be really careful with that meter probe when you have the power on
- Don't glue the top plate onto the base (you'll be taking it apart again soon enough...)
Not Required, but Nice to Have:
- Better Multimeter (4 digit readout, with Capacitance for parts checking and Frequency measurement for tracing hums are good things)
- Panavise (expensive but Very Useful)
- Tunes while you work
- Adjustable Soldering Iron and heat sinks for fine work (most ICs really don't like heat)
- Parts storage bins
- Nibbler (great for cutting odd holes in sheet metal)
- Dremel Tool and Bits (well, there's nothing like it when you need one)
- Heat shrink torch (much cleaner and easier than a candle)
- Dental picks
- Dental mirror for checking tight spots
- Set of Nutdrivers and Hex Wrenches
- Set of Fine Screwdrivers
- A buddy with analog electronics experience for pestering/questions
- Spare screws, insulated and conductive standoffs, zip ties, etc.